How to add a custom section to Shopify
(no app)
Every section is a single self-contained .liquid file with no app, library or global theme style dependencies. Follow the steps below and it will be live in your store within three minutes.
Why copy-paste beats a section app
For one-off sections — a FAQ page, a hero, a before/after slider — a paid app is usually overkill. A copy-paste .liquid section is free, loads no third-party script, and keeps every setting in the theme editor like a native Shopify section. Trying to add a FAQ page without an app? That topic has its own step-by-step guide.
| Comparison | Drop-in Native Section | Shopify App Store Plugin |
|---|---|---|
| Recurring Cost | $0 / Lifetime Free | $9 – $49/mo forever |
| Speed Impact | 0ms delay (90+ PageSpeed) | +300ms–800ms lag, script bloat |
| External Scripts | 0 external requests | 3–10 tracking & CDN scripts |
| Editor Control | 100% Native OS 2.0 blocks | External dashboard / iframe embed |
| Uninstall Cleanliness | Clean 1-file delete (0 ghost code) | Leaves orphaned tags in theme files |
00Start with these sections
Install one high-intent module first, confirm copy → paste → add in the theme editor, then pack the rest from a solution kit.
- PDP Sticky Add to Cart — Bottom sticky ATC bar that appears after scrolling past its anchor
- Bundle Offers — Bundle cards with badge, price + compare-at price
- Countdown Timer — Promo countdown banner with CTA, dark/light schemes
- FAQ Accordion — Accordion FAQ with category tabs and animated indicator
- Comparison Table — 3-model comparison table, yes/no rendered as icons
- Before / After — Draggable before/after image comparison slider
- PDP Buy Box — Full buy box: gallery, rating, price, color swap, quantity, ATC, benefits
- Testimonial Slider — Scroll-snap testimonial carousel with star ratings
- PDP Sticky Add to Cart — 粘性加购条:页面滚过模块锚点后从底部浮出(缩略图 + 名称 + 价格 + CTA),可关闭且不再打扰。
- Bundle Offers — 套装优惠卡片:三列 bundle 卡,含角标(Most popular)、现价 / 划线价与按钮,悬停浮起,提升客单价利器。
- Countdown Timer — 促销倒计时横幅:文案 + 天/时/分/秒计时 + CTA 按钮。深色/浅色两种配色,到期自动显示结束文案。
- FAQ Accordion — 带分类 Tab 和滑动指示条的手风琴 FAQ。按 Category 字段自动分组生成 Tab,每组默认展开第一条。
- Comparison Table — 三个型号横向对比表:首列型号高亮,单元格输入 yes / no 自动渲染为勾叉图标,也支持自由文本,移动端可横向滚动。
- Before / After — 前后对比滑块:拖动手柄擦除对比两张图片,支持触摸与键盘(原生 range 输入),可设初始位置与角标文案。
- PDP Buy Box — 完整购买主区:图库 + 星级评分 + 现价/划线价 + 颜色切换换图 + 数量步进器 + 加购按钮 + 权益行。
- Testimonial Slider — 横向滑动的评价卡片轮播,星级评分 + 引言 + 买家署名。桌面 3 卡、移动 1 卡,支持箭头与触摸滑动。
01Preparation
Before you start, confirm these two things to avoid getting stuck later.
Make sure your theme is Online Store 2.0
Sections are built on the OS 2.0 section architecture. Dawn, Sense, Craft, Prestige, Impulse and other post-2021 themes all qualify. Quick check: if the theme editor lets you "Add section" on any page, it is OS 2.0.
Legacy vintage themes (such as a non-upgraded Debut) only support sections on the homepage — upgrade the theme first.
Make sure you can edit theme code
You need the store’s "Themes" permission (owner or an authorized staff account). We recommend duplicating the theme first: theme card → … → Duplicate. Changes only touch the copy and can be rolled back anytime.
02Installation
Six steps from copy to final preview, using any section as an example.
Copy the section code
Find the section in the library and click the copy button at the bottom right of its card; or open the detail page, switch to the "Code" view to inspect it, then click "Copy full .liquid code". The complete source (HTML + CSS + JS + schema) lands in your clipboard.
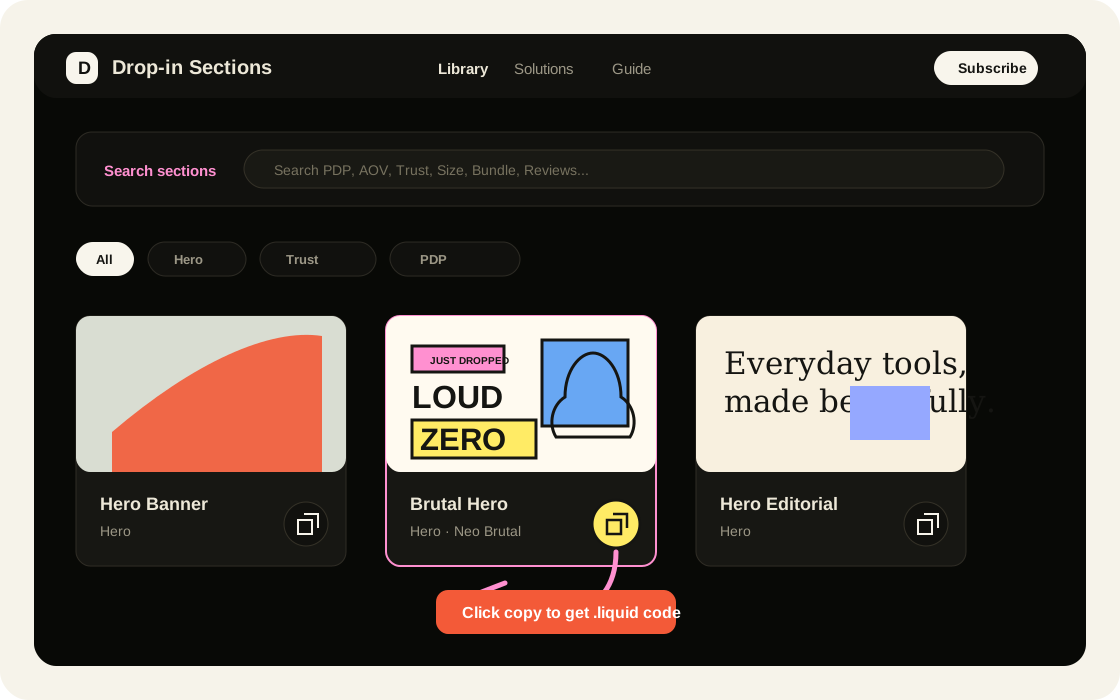
Open the theme code editor
Locate the sections/ folder in the file tree on the left. For a production store, work on a duplicated draft theme first and publish only after previewing.
Create a new section file
Click "Add a new section" under sections/, pick the liquid type and use the file name shown at the top of the section’s detail page (e.g. dropin-hero-split — no .liquid suffix needed).
Keeping the file name identical to the section avoids clashes with existing theme sections and makes future updates easy to match up.
Paste and save
Delete all of the placeholder code generated in the new file, paste the section code and hit "Save". If saving fails, you most likely left some default code behind and now have two {% schema %} blocks.
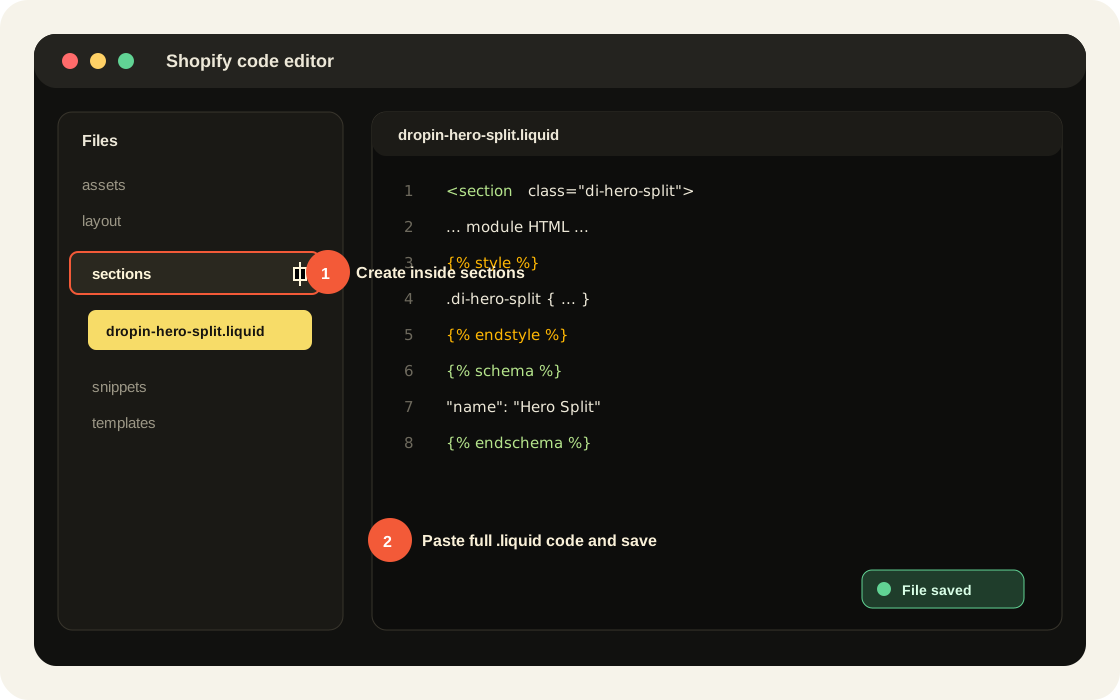
sections/. Once it saves successfully, it can appear in the theme editor under "Add section".Add the section to a page
Back in the theme editor (Customize), refresh the page, click "Add section" on the target page and search by the schema name (same as the section title). Click to insert — it ships with ready-to-preview default content.
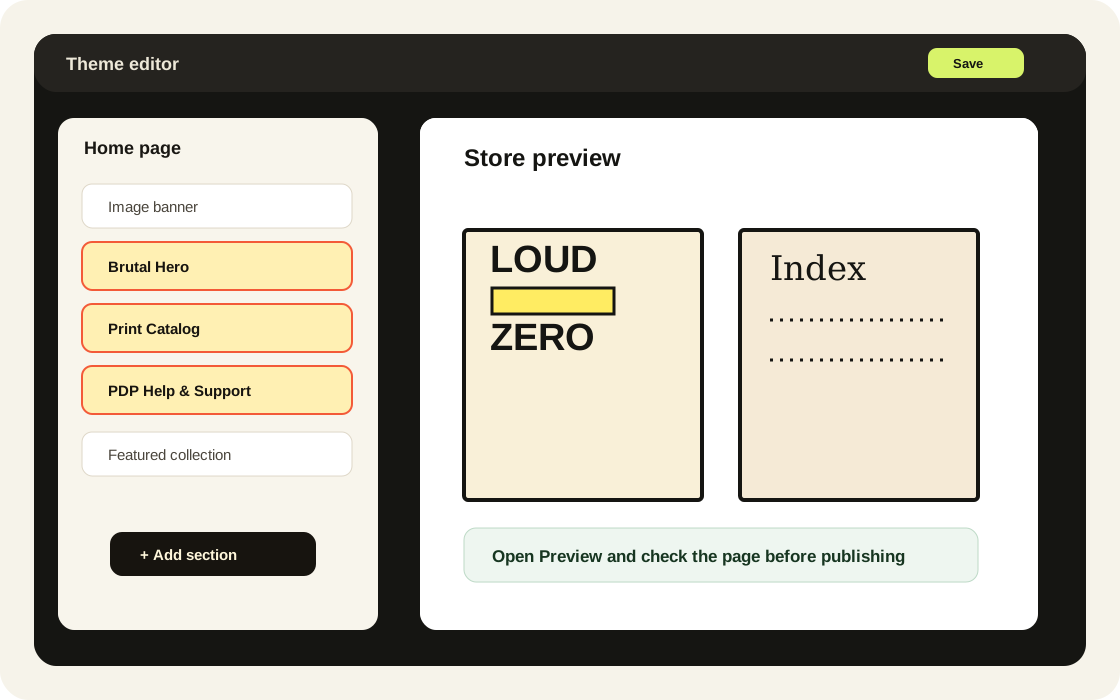
Open preview and verify the result
Click "Preview" in the theme editor, then check that the section renders, button links are correct, and desktop/mobile widths do not show cramped text or horizontal scrolling. Publish or copy to the live theme only after this pass.
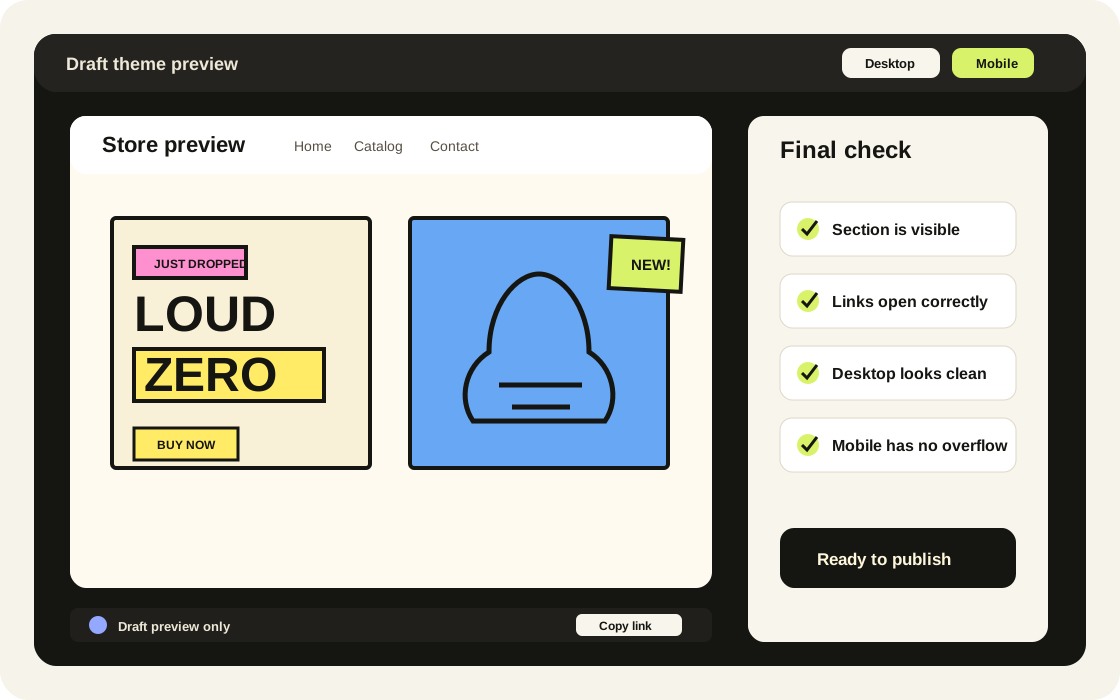
Tip: sections can be added to every page template by default — home, product, collection, blog and custom pages all work, and you can freely stack and reorder multiple sections on one page.
03Configure in the editor
Everything is edited visually in the theme editor — no more code.
Edit copy, images and links
Select the section and the settings panel on the right is grouped by content → style → spacing. Replace headings, subheadings, button labels, URLs and images there; upload images at the recommended sizes noted on each setting for faster loading.
Add, remove and reorder blocks
Sections with repeating content (FAQ items, testimonials, feature cards, timeline nodes…) are organized as blocks. Click "Add block" to add one, drag the handle to reorder, click a block to edit it on its own, and delete to hide it — the layout adapts automatically.
Adjust vertical spacing
Every section ships "top padding / bottom padding" sliders to control breathing room against neighboring sections — no CSS required.
04Advanced tips
Want to go further? Light customization inside the section file is easy.
Match brand colors and fonts
Section colors are mostly concentrated in CSS custom properties or the {% style %} block at the top of the file — search the hex value (e.g. #ff2d16) and replace it to switch to your brand color. Fonts inherit the system font stack by default and can be pointed at your theme’s font variables.
Multiple instances on one page
Every section scopes instance-level IDs and events with section.id, so adding the same section several times on one page just works — no interference.
Update to a new section version
When a section is updated, re-copy the code from its detail page, overwrite the entire content of the same-named file under sections/ and save. Copy and images configured in the editor are keyed by setting ID, so same-named settings are preserved automatically.
Remove a section
Remove the section from the page in the theme editor first, then delete the matching .liquid file in the code editor. No leftover styles or scripts.
Maintain 90+ PageSpeed & Core Web Vitals
Native sections load zero external dependencies. To ensure maximum mobile speed: (1) upload compressed images with recommended aspect ratios, (2) let below-the-fold images lazy-load naturally, and (3) uninstall outdated third-party apps whose features are now handled natively by these sections.
05FAQ
Hit a snag? Check here first — it covers the vast majority of cases.
The new section doesn’t show up under "Add section"?
First confirm the section file saved successfully without errors, then refresh the theme editor page. If it is still missing, check that the file was created under sections/ (not snippets/) and that the pasted code includes the closing {% endschema %}.
Schema error when saving?
The most common cause is leftover template code auto-generated by Shopify when the file was created, which leaves two {% schema %} blocks in the file. Select all, delete, and paste again.
Will it slow my theme down?
No perceptible impact. Each section’s CSS/JS is inlined inside the section and only loads on pages that use it, no external libraries or fonts are pulled in, and images lazy-load by default.
Will section styles clash with my theme?
No. Every class, animation and event carries a section-specific prefix (the di- namespace). Sections never style global selectors like body or button and never depend on any theme CSS/JS.
Can I use them on product / collection / blog pages?
Yes. Sections are enabled for all page templates by default — just "Add section" in the theme editor for that template. Even sections built for specific spots (like the announcement bar) can be placed anywhere.
Animations not playing on some devices?
That is intentional: all sections honor the system "reduce motion" (prefers-reduced-motion) setting. Visitors with it enabled see a static, animation-free version — an accessibility best practice.
How do I add a FAQ page to Shopify?
You do not need an app. Follow our step-by-step FAQ page guide: copy the free dropin-faq section, create the file under sections/, and add it to a page in the theme editor.
Are these sections better than a FAQ app?
For a typical store, yes: a copy-paste section costs nothing, loads no third-party script, and keeps every question editable as blocks in the theme editor. The FAQ Accordion section is a free alternative to paid FAQ apps.
Still have questions?
Installation trouble, custom section needs, or a section type you want us to add — get in touch.